Wednesday, August 29, 2018

Crispy Coconut Chicken Tenders


My grandmother loves using coconut in almost all her food. And its not just limited to using it for her cooking, she uses coconut even as a garnish in most of her foods. She makes khopra par (a dessert consisting of coconut, mava and sweet syrup),which is my ultimate favorite. Having spent a lot of time with her, growing up, I really found a liking towards using coconut flavors in my food. This was one of the inspirations for using desiccated coconut/coconut flakes in my chicken tenders. #makinggrandmaproud

Chicken tenders is something that has been done over and over again, so using coconut instead of traditional breadcrumbs was an inviting variation. This is a simple and light dinner recipe, can be used as a side or a snack too.. It might seem like there are many parts to it. There is definitely more prep work required for this, but its quick once all the prep is done.

You can pair it well with a salad, or guacamole or any other dip really. You can make it spicy by adding more cayenne pepper to your coconut flakes or keep it mild by reducing the amount. I paired my crispy tenders with glazed carrots to amp up our dinner. But this could easily be served as a finger food during game night. Another variation to this recipe would be to bake it. I am making the most of my summer frying days. Saving my baked tenders for winter nights. ;)

But yes, a recipe with many variations that can suit everyones needs.. Light, crunchy and summery. You can also replace the chicken in the recipe, with fish or shrimp for another fun variation. Hope you enjoy it!

Prep Time: 20 mins Cook Time: 15 mins

Ingredients:

  • 1 chicken breast, chopped into 3" cubes
  • 2 cups coconut flakes
  • 2 tsp cayenne pepper
  • 1 cup all purpose flour
  • 2 eggs
  • handful of fresh cilantro (can be substituted with parsley), chopped
  • 2 tbsp Mrs Dash seasoning
  • Salt
  • Pepper
  • Oil for frying

Directions:

  1. Season chicken evenly with salt and pepper
  2. Add 1/2 cup flour, eggs, cilantro and Mrs Dash seasoning in a bowl and whisk together. If the batter feels too thick, add a little water to make the batter thinner, until right consistency is achieved
  3. In a separate shallow dish, mix together coconut flakes and cayenne pepper
  4. Add remaining 1/2 cup flour, in a plate or a shallow dish for dusting the chicken 
  5. Shallow fry / Panfry chicken
  6. Heat oil in a shallow pan on medium heat
  7. Dust each chicken in the dry flour and take off excess. Next, dunk the chicken into the egg mixture. Then coat the piece in coconut flakes to make sure it is even coated.
  8. Shallow fry chicken pieces in the pan for about 2-3 mins on each side, until light golden brown. 
  9. Drain off excess oil and serve hot!
Like I mentioned earlier, I paired my crispy coconut chicken tenders with glazed carrots and sweet chili sambal sauce. Recipe for the glazed carrots is also added below.

To make Glazed Carrots:

  • Carrots, 3
  • Butter, 1 tbsp
  • Brown sugar, 1 heaped tbsp
  • chopped Dill (optional)
  • Salt and pepper - a pinch
  1. Boil carrots in hot water for about 8-10 minutes making sure they are dipped in the water. 
  2. Drain and let them cool in a strainer
  3. Add butter to the same pan, stir brown sugar, salt and pepper powder into the button until the sugar has melted.
  4. Add carrots and the chopped dill leaves to the pan and cook for another 5 mins
Crispy Coconut Chicken Tender with glazed carrots

I hope you try this recipe soon, and enjoy it with your loved ones like I did. Feel free to comment with questions and suggestions. Until then, Live, Love, Laugh and Eat.. Oh yes, EAT!


Thursday, August 23, 2018

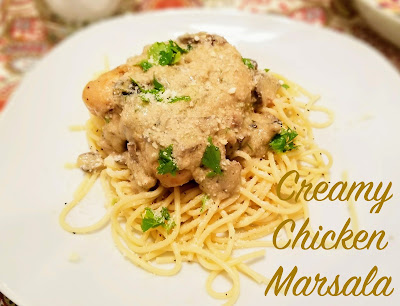
Creamy Chicken Marsala


Italian meals are one my favorites! They are quick, easy to make and yet feel so elevated. Luckily, everyone at home is a big fan of Italian cuisine as well, so its a win-win for me. When I first came across the recipe for Chicken Marsala, I couldn't believe how quick and easy it looked. I thought, it wouldn't turn out restaurant quality - because the instructions were too simple for that. But believe me, this simple dish turns out restaurant quality every single time. I've made it for friends, for weeknight dinners, and its been a winner every single time! I'd probably rank this, in my top 5 under 30 minute recipes. Yeah, you read that right, its ready in under-30 minutes. You can pair this with spaghetti, or with some garlic bread as an accompaniment. If you don't want carbs to go with it, even a salad pairs pretty well with this. I once paired it with Brussel sprouts and mashed potatoes, and that turned out beautiful too. If you're ever cooking to impress someone and don't have enough time to prep, this recipe is one you will see yourself coming back too. I know I always do.

One key note while making this dish, is to make sure your breasts and thinly sliced. This makes it easy to cook the slices, and reduces your time to cook. Thinner slices of chicken cook fast, and also end up tasting juicer. Since, you don't tend to overcook it. If your slices are too thick, it takes a while to ensure they are cooked thoroughly and this sometimes leaves the breast a little dry.

Also, I know the main ingredient for Chicken Marsala is marsala wine, but since I didn't want to use marsala wine, I substituted it with apple cider vinegar. And it worked out perfectly.

Cook Time: 25 mins Prep Time: 5 mins

Creamy chicken marsala over lemon parsley spagetti

Ingredients:

  • 4 boneless skinless chicken breasts, thinly sliced
  • salt and pepper
  • 2 tbsp olive oil
  • 1½ cups mushrooms, sliced
  • 1/4 cup apple cider vinegar
  • ½ cup chicken broth
  • 1 cup heavy cream
  • 1 tsp ground mustard
  • 1 tsp garlic salt
  • 1 tsp Mrs Dash seasoning
  • 1 tsp Parmesan cheese
  • Fresh Chopped Parsley for garnish

Directions:

  1. Season the chicken breasts with salt and pepper.  Heat a skillet on medium heat. Add 1 tbsp olive oil and cook the chicken breasts for about 3 mins. Flip over and cook other side until both sides are lightly brown and cooked throughout. This should take a total of 6-8 mins. Remove chicken and set aside. 
  2. Add another tbsp of olive oil and cook the mushrooms for approx 2 mins. Add the apple cider vinegar and bring to a boil. Add the chicken broth, heavy cream, mustard, garlic salt and Mrs dash seasoning. Bring it to a boil and reduce heat. Simmer for about 10 mins or until the sauce begins to thicken. Place the chicken back in the sauce and continue to simmer for about 3-4 minutes. Sprinkle with parmesan cheese once ready to serve. 
Optional: To serve with spaghetti: 
1.  Boil water with a few drops of olive oil. Once boiling, add spaghetti and cook until al dente. Add a few drops of lemon juice once done and let it sit for about 1-2 mins. Now drain pasta in a strainer and run it under cold water. Add chopped parsley and toss in strainer.

I hope this one becomes a regular in your kitchen too, like it has in mine. Please leave me a comment below if you do try it, and let me know how it went for you! Until then, Live, Love, Laugh and Eat.. Oh yes, EAT!

Tuesday, August 21, 2018

Amsterdam Food Diaries


A month back, my husband and I had a short stay in Amsterdam. Like I do before any holiday, I started researching all the dos and don'ts for our visit. The best places to eat, the best views to capture, touristy hot-spots, local favorites, yep - a lot of research goes into our trips. So when I started looking further into Amsterdam, apart from their infamous red-light district, windmills, museums and canals, there were sooooo many blogs on all the must-try foods in Amsterdam. We tried to pack in as much as we could in our 3-day schedule, but definitely missed out on a few. I will link the blogs that I looked into for my research at the bottom as well, in case any of you guys would like to try out some of the stuff that we couldn't fit in. But I had to share all our food encounters with you all. Before we started planning for our trip, I did not realize what a big food haven Amsterdam was. From sweet treats to deep fried goodness, from breakfasts of champions to dining like a king, there was food galore! I will be sharing all the restaurants and foods we tried, but in addition, will list my top 3 and special treat, husband's top 3 recommendations as well.. Super excited about this one, because this is the first time the hubster has agreed to provide direct input to the blog. So without wasting much time, I will get right onto it.


Day 1 - 


Thai chicken skewers

Croquettes

We started our day by making a trip to Amsterdam Centraal. Reaching there like hungry bears, we made our way to the Loetje Centraal right opposite the station. Yeah, we might have even sniffed our way to the restaurant. But oh how surprised we were! Sitting by the canals right opposite the station, this was definitely a popular touristy spot. Luckily, for a table of two, we didn't have more than a 3 minute wait. It was also a find-your-own-table sorta restaurant, so the hustling New Yorker within us found our way pretty quickly. Service was slow, especially for such a busy location. We ordered the chicken satay skewers and croquettes. Although I read that the best Croquettes were found by the street vendors, I decided to start my first meal at a reputed restaurant. The croquettes did not disappoint!!!! The chicken skewers were lovely as well. All in all, I would say a lovely restaurant, amazingly located, good food, only complaint would be the service.


Once our stomachs were full, we went around the city, tried different cheeses at many of the local cheese shops, but an amazing local find that we both couldn't keep our hands off were their Stroopwafels! A stroopwafel is a waffle made from two thin laters of baked dough with a caramel syrup filling in the middle. This made up for our mid-day meal/all day snack/breakfast.. everything. 


Chicken Schnitzel


Dinner too ended up being right by Amsterdam Centraal (coz that was our drop-off point for the canal cruise, another MUST DO!!) and we headed to a restaurant called "Flame" which looked like a steakhouse. Husband got his share of steak and I ordered a Schnitzel which was basically a dutch version of fried and breaded chicken breast. Again, the restaurant did not disappoint and we left with happy and satisfied stomachs!

Day 2 -

Dutch pancake with cinnamon ice-cream and stroopwafels
Chicken with pineapple and cheese pancake
Day 2 started off with a local favorite, The Pancake Bakery. I heard so many people rave about the Dutch pancakes, we could not miss this visit as part of our trip. Again, we got a table here without much of a wait. They had seating right by the tiny sidewalks lining the canals and we found ourselves a cozy, quaint spot. Between the two of us, we decided to order a sweet and a savory pancake. We ordered the original Dutch Pancake, oozing with stroopwafels (yes, we didn't have enough already), cinnamon ice-cream, chocolate flakes and whipped cream.. again, whats there to go wrong with this one.. We were equally impressed with their savory pancake, we got the chicken, cheese and pineapple pancake. Their coffee was amazing too and came with a mini stroopwafel with it. YES, WE COULDNT GET ENOUGH OF THE STROOPWAFELS!


Chocolate coated waffle with custard and berries


During the day, we nibbled on Poffertjes, which are tiny fluffy dutch pancakes. They are spongy and reminded me of Madelines back home.  We also had a chocolate coated waffle, with berries and custard. Talk about living the good(junk) food life! These were lined at most local bakeries and are so inviting when you walk by. We finally decided to give in an tried some of those waffles with some local coffee and an ice-cream shake, another popular local sweet treat. The chocolate waffle however, did not end up to be as tempting or scrumptious as it looked. The waffle seemed stale, and the chocolate coating seemed too sweet, and all in all, it seemed like a dry stale waffle. This could be just our experience, or maybe a wrong pick, but it definitely fell off of our favorite list. 


Vlaamse Frites with spicy mayo

Another local delicacy I had to try on our trip were their cheesy fries, locally known as "Vlaamse frites". And these weren't like any cheesy fries I have ever tried before. They mean cheese when they serve you cheesy fries. We chose some spicy mayo to add to our cheesy fries, but the options were endless. They had a huge menu of seasonings and toppings to add to your fries. Generous portions, always fresh and steaming hot. It totally made sense why we saw a line waiting for the fries before we saw the actual signboard to the store! I cannot remember the exact name of the store we had these at.  But every Vlammse frites store we passed, and there were bazillions we passed, seemed to match up in appearance. But yes, please please please, forget the calories and indulge in this amazing local delicacy if you happen to visit Amsterdam. After gobbling up on this awesomeness, our stomachs were full, but our hearts weren't. We wanted to try more local foods, and ended up finishing off our day with Doner kabobs. This was another local street food that seemed to don the windows of many local vendors. There were tons and tons of halal doner kabob joints along the canals of Amsterdam. Before calling it a night on our foodventure-filled day, we indulged in some Doner kabobs. Now being from New York, we did have certain expectations from a Halal cart. But once again, this food haven city, did not disappoint. My husband and I returned back with our tummies and hearts satisfied! 


Day 3 -


Day 3 began with a mission for us. It was our last day in this city and we decided to end it in style! During the day, we headed to Zaanse Schans, a historic neighborhood close to Amsterdam. Mainly known for its well-preserved windmills and houses. We visited a local cafe here and had some delicious coffee and breakfast. Breakfast was mostly baked goods from the local bakery, which was basic, but scrumptious. Apart from visiting different windmills, that are still very well functioning, we wanted to get a taste of the local rustic village.
Risotto Nero

We decided to dine at a restaurant in Zaandam. Like we had previously decided, we wanted to sign off our trip with a luxurious yet local meal, and this landed us at Inntel Zaandam for our dinner. We opted for a 3 course meal each, that included appetizers such as a traditional "Huisman" mustard soup with Dutch shrimps and creme fraiche, crispy chicken in Duyvis nuts, concasse of Kumato tomato and local sambal. Our main courses included Grilled beef steak with sweet potato, fresh vegetables and béarnaise sauce and a Risotto Nero - black risotto with vongole, crayfish and poached egg. To finish off, desserts included Crème brûlée with apple, and 'Boerenjongens' ice cream and Macaron of red fruit, with raspberry sorbet and white chocolate mousse. They advertised that all their ingredients were locally grown and made with a pinch of Dutch love! 

Creme brûlée
Macaron of red fruit

Husband's top three - 

  1. His number one is undeniably the Stroopwafels. Yeah, he was kinda obsessed. Not to say I wasn't. But he literally ate them at any hour of the day. 
  2. Cheesy fries. I feel kinda sad, this one dropped to #2, but I understand. These choices are really really hard. Those Vlaaamse Frites are definitely worth every blocked artery calorie that it came with. Couldn't stop binging. Deep-fried-warm-delicious-goodness! I'm sure whoever thought of potatoes and cheese as a combination, is pure genius! 
  3. My homeboy, being the total New Yorker that he is, fell for his Doner kabob. They were delish, greasy, and flavorful to say the least. He sure felt at home with this one. 
Special mention: Husband wanted to list Top Picks instead of top three, since he thinks narrowing it down to three was not fair.. and so we compromised on giving the Dutch pancakes a special mention! Sweet and savory, both ranked the same for him. But definitely another MUST TRY when in Amsterdam. 

My top three - 

  1. My number one pick is undoubtably the Vlammse Frites. Died eating them, will be ok to die after eating them too.. a definite MUST MUST MUST try if you're ever in Amsterdam
  2. The second favorite for me was the Mustard soup I had on our last day there. It was so light, so fresh and sooooo good! It had that local rustic feel and yet felt so elevated in flavors. Definitely, going to look up the recipe and try to recreate this one back home
  3. The last one, is so hard to just pick one, but it would probably be the local pancakes. I find it hard to chose between the sweet dutch pancake that I got and the savory pancake with chicken. But just cause I have to pick one, it would have to be the dutch pancake with STROOPWAFELS! I think I'm kinda obsessed with them. (Fun fact: I could buy a box at my local trader joes!!! Not the same as the dutch ones, but works for my casual cravings) :D 
Hope you enjoyed reading this post, and like I mentioned above.. the list was inexhaustible. We tried to fit in as much as we could in our schedule. Hoping this helps with your trip planning as well. Or even if you are just looking for cooking inspirations. Please let me know if you liked this post, or if you have any questions/suggestions. Until then, my loves, Live, Love, Laugh and Eat.. Oh yes, EAT!


Links we used for research -   


Monday, August 6, 2018

Thai Coconut Steak


My husband is an avid steak lover! And before I start this post, I will publicly accept, he is better at cooking as well as buying steak. He knows his cuts and how to cook them.. Now that I am done with this public announcement, I feel better about sharing this recipe with you all. Because the first time I gave this recipe a shot, it was a complete and total failure! And I was warned never to go steak shopping myself.. ever again..! I did all the wrong things possible with my steak, did not buy the right cut, I think I bought boneless steak instead of skirt/flank steak - Rookie Mistake #1. Then I cooked my steak before bringing it to room temperature - Rookie Mistake #2. Hell yeah, I even cut the steak against the grain.. like I was supposed to know that is even a thing. The only thing I got right, and luckily aced, was the flavor. Yep, at least I got the marinade right. And this is why I gave my steak a second chance, this time buying steak with the husband. And yep, the second time around, I corrected all my rookie mistakes from the previous mishap, and have an amazing recipe for you guys to try out. I will also list all the dos and don'ts I learned from both my experiences. Hopefully, either you guys are laughing at me for my lack of basic steak knowledge. Or are fumbling just like me and this will be a beginners guide to some of you.

First things first, invest in buying good quality steak, that protein does make or break your dish. For this particular recipe, we went ahead with skirt steak, the thing I learnt about skirt steak was, it is a juicy yet thin slice of steak, this is what makes it easy to overcook.. will get to more cooking details later, but before that, I was taught how to cut it across the grain, so that it isn't too tough when you cook it. Another myth that was broken for me was, that marinating the steak doesn't make it any tender. It just permeates the outer layers of the meat, but it does bring a lot of FLAVOR to the meat. And yes, flavor was definitely my forte in this game. This coconut marinade, is definitely the right summer flavor for your steak! Another word of caution though, remember to dry your steak completely before cooking it. The mantra for me to follow here was MOISTURE is the enemy of caramelization.  So make sure to blot your steak with paper towels before cooking them. And last and most important lesson for me was, DON'T COOK THE STEAK IF ITS STILL COLD! I might have even repeated this mantra a few times.. lol.. alright, thats overdoing it, but yeah, make sure the steak is at room temperature before you cook it. Especially this cut of steak, since it cooks so fast, and you don't want to overcook it. That's why, you wait till the steak is at room temperature. So you don't just cook the outside and have a raw inside. Or wait too long to cook it, and hence end up overcooking it.

Last word of advice, before you go ahead with the recipe, resting is key. While making a steak, make sure you rest your steak for a few minutes, so the moisture is spread evenly through the meat before you begin cutting it.

Prep Time: 15 mins  Cook Time: 15 mins

Ingredients:

  • ½ cup coconut milk
  • 1 tbsp brown sugar
  • 2 teaspoons lemon zest
  • 2 tablespoons lemon juice
  • 2 teaspoons Thai fish sauce
  • 1 tsp ground pepper powder
  • 2 teaspoons ginger garlic paste
  • 1 pound beef skirt steak, cut into 4-inch lengths
  • ½ teaspoon coarse sea salt
  • 2 tbsp unsalted butter

Directions:

  1.  In a bowl, whisk together the coconut milk, brown sugar, lemon zest, lemon juice, fish sauce, pepper powder and ginger garlic paste. Place the steak in a ziplock bag and pour the marinade over the steak. Seal the bag shut making sure you take all the air out. Refrigerate the steak for 6 - 12 hours. 
  2. Drain the steak marinade and pat steak dry. Sprinkle the steak with some salt. (Make sure your steaks are at room temperature before you start cooking)
  3. Heat an iron skillet with some butter. Place the steaks in the skillet and let it cook for 3-4 minutes on each side. Flip over and ensure both sides are cooked to desired doneness, that should be 6-8 mins depending on thickness of the steaks
  4. Lets steaks rest on carving board at least 4 minutes before cutting lengthwise, across the grain
Thai Coconut Steak with Spicy BBQ sauce and Asian salad

You can serve the steak with either a salad or some baked potatoes. Either way, this steak would be the perfect summer dinner for you and your family. I've pinned this recipe to my healthy beef recipe board, hoping you all give it a go this summer as well.. As always. feel free to post any questions, comments or suggestions below. Until then, Live, Love, Laugh and Eat.. Oh Yes, EAT! 


Wednesday, August 1, 2018

Stuffed bell peppers


Have you ever had to buy colorful bell peppers for a dish and been stuck with extra halves of each color? Well, that happened to me. I bought bell peppers for another recipe and ended up with halves of green, yellow, orange and red bell peppers. Looking at these beautiful summer colors, I could not help but make a dish that brought out the color and taste of these beautiful peppers! That was my inspiration behind this yet another quick and easy meal..

The stuffing for this dish is my go to recipe for ground beef/kheema. I use this mixture to make stuffed rolls, fry kababs, just a basic filling recipe. When I do use this mix to fry kebabs, I add some gram flour (can substitute with all purpose flour), to this mix. This helps bind the kababs well, when frying.

Ingredients:

For the filling:

  • 1 lb ground beef
  • 1 small onion, finely chopped
  • 2 green chillies, finely chopped
  • 1/4 cup coriander/cilantro leaves
  • handful of mint leaves
  • 1 tbsp ginger garlic paste
  • 1 tsp garam masala powder
  • 1 tsp red chilli powder
  • 2 tsp coriander-cumin powder mixture
  • salt to taste

For the bell peppers:

  • Colored bell peppers - cut in halves
  • 4 Cheese blend - optional
  • Oil for coating
  • Cilantro for garnish

Directions:

  1. Wash the ground beef and dry it in a strainer.
  2. Heat some oil in a pan and roast the ground beef for a few minutes. Add remaining ingredients for the filling and cook until the meat is cooked
  3. In the mean time, clean the inside of your peppers and coat them with some oil.
  4. Add the mixture to the bell peppers and bake at 375 F for about 20 mins. 
  5. Sprinkle cheese and cilantro before serving! 

And that is it, your stuffed bell peppers and ready to serve! Hope you like this quick summer fix. Please feel free to comment and give me feedback on the recipe, or to ask any questions. Until then, Live, Love, Laugh & Eat.. Oh yes, EAT!